Showing posts with label Cooking with Kids. Show all posts

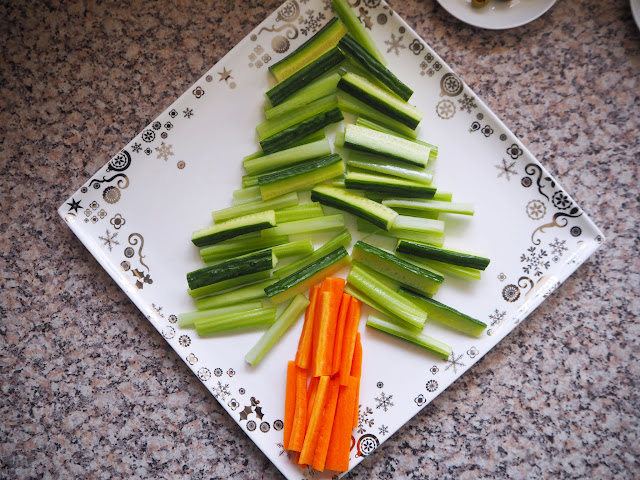
Healthy Veggie Christmas Tree Share Platter. Cooking with Kids.

Dec 23, 2015


This year we thought that we'd come up with a healthy Christmas share platter, bound to stand out amongst all the sweets and treats that usually adorn the Christmas party table.

This fruit (my kids wanted to point out that some of the ingredients we use are technically fruits) and vegetable Christmas tree share platter would be perfect for taking along to a class party or family get together and is simple enough to get the kids involved in the preparation. I've found over the years that having children regularly involved in cooking and food preparation, makes them more inclined to try new things and gives them the information needed for making future choices for themselves based on their knowledge of foods, our needs and healthy living.

Healthy Veggie Christmas Tree Share Platter

Ingredients: (we used)
  • Celery 
  • Cucumber
  • Snow peas
  • Sugar snap peas
  • Red and Yellow Capsicum (peppers)
  • Red and yellow cherry tomatoes
  • Olives (black and green stuffed)
  • Carrot
  • Cheese (cheddar cheese slices) Optional- leave out for dairy free option

Materials:
  • Knife
  • Chopping board
  • Peeler
  • Star cookie cutter (optional)
  • Large platter
Don't forget, before you start any food preparation you need to wash your hands.

Chop your carrot, celery and cucumber into sticks around the same size and length. Depending on your child's knife skills, you might want to help them with this part.
Older children can assist with the peeling and chopping of the harder vegetables.
Younger children will enjoy cutting stars out of slices of real cheese.
Halve your cherry tomatoes, olives and cut thin slices of capsicum to decorate the tree.
With your ingredients prepped, you are ready to build your tree! Children of all ages can help with this part.
Use the carrot sticks for the base and your cucumber and celery sticks to build the shape of the tree.
Layer your snow peas and sugar snap peas over and in your tree.
Arrange your capsicum strips on top of the tree for tinsel.
Decorate all over the tree with your tomatoes and olives.
For the finishing touches, add your star shaped cheese. For a dairy free option, you could cut stars from yellow capsicum.
Serve your tree fresh with your favourite dips and watch it disappear.

We really enjoyed creating this Veggie Christmas Tree and got to practice many kitchen skills, fine-motor skills and talk about different foods and healthy eating along the way. The kids (and I) were really impressed with the results at the end and it was hard to photograph before my kids wanted to dig in!

Here are some more Christmas Recipe ideas you may want to try with the kids:

Happy creating,
Debs :)


Look where else we are. Are you following along? :)
New Here? Subscribe to get all activities sent directly to you
Enter your email address:


Delivered by FeedBurner
Continue reading...


No Bake Reindeer Cookies. Fun Christmas Food Idea

Nov 18, 2015


Each Christmas we enjoy making a little Christmas themed gift for the children in my kids' classes. 

Our favourite idea was our playdough Christmas tree bags. They make a great sugar-free alternative to balance out all the treats that usually get given out around Christmas time. 

This year however, we needed a different idea so thought that we'd have a go at making some reasonably quick and easy little Rudolf the Red Nosed Reindeer cookies.

Using bought biscuits definitely cuts out a lot of time and the trickiest bit is melting the chocolate, which makes it a good activity to get the kids involved with too. 

If they're the ones giving the gifts, they might as well help make them!
Continue reading...


Healthy Choc Rice Bubble Treats. Cooking with Kids.

May 24, 2015


We love a sweet treat (who doesn’t?) but increasingly I’m noticing that treats are becoming more of a regular thing than an occasional, “treat.” In fact, I could pretty much refuse to personally give my children a single treat and they’d still end up with plenty. Between grandparents, special events, birthday parties, class parties/birthdays, etc. they are getting these sorts of treats quite regularly. Most of these commercial sweets however are full of things, like refined sugars and unnecessary chemicals and colours that don’t add any nutritional benefit to my kids at all.

So, as a way to ease my concerns a little, I decided we'd attempt to make more of our own sweet treats using healthier alternatives. Still sweet, still a yummy treat, but one that can be slipped into the lunchbox guilt free. You can click on the links in the Ingredient list below to read more about why these ingredients are not only better than the alternatives, but provide health benefits as well.
Continue reading...


Kitchen Hacks for Busy Mums

Apr 2, 2015

This post is brought to you by Nuffnang and DAIRYLEA

Recently I was invited by DAIRYLEA to take part in their Hackademy, where a group of Mums got together to chat "MUMMY HACKS." Little helpful tips and tricks that make the overall job of being a Mum, just that bit easier. It was a fun day with lots of great ideas that you will be able to see on the MUMMY HACKS website. 

As I find myself spending a fair bit of time in the kitchen, it's an area that I am always happy to reduce time in and make things a bit easier for myself. Over the years I have found some ideas have been more useful than others and some I find myself using all the time.


5 Kitchen Hacks


Mummy Hack #1 Make your own Smoothie-poles

We love smoothies at our house as they are a great way to use up fruit and include a good serve of dairy. We usually make our smoothies from a combination of full cream milk, greek yoghurt and a variety of fruits, spices or honey for different flavours. You could make dairy free ones with a combo of fruit, juice, ice and veggies. Play around with combinations to vary the taste and use the ingredients you have on hand.

When making up a smoothie, I always make a bit extra as it means that I can freeze it and the kids can have a frozen treat on another day. 


Banana-berry smoothie and icy-poles

Whizz together 2 cups of milk, 1 ripe banana, half a cup of berries (frozen or fresh), half a cup of greek yoghurt with an optional squeeze of honey or sprinkle of cinnamon to taste. Vary the amounts to suit the amount of children you have and the amount of icy-poles you want to make.


One afternoon my kids will have the fresh smoothie we've made and the next afternoon they can have a smoothie-pop instead.


Banana and raspberry is a particular favourite with my kids.

I find that my children are more likely to try new foods and generally eat healthier when we cook and prepare foods together. It's a great time to discuss foods and learn more about healthy eating.

Pop over to the MUMMY HACKS website to see the rest of my top Kitchen Hacks for Busy Mums.

You might also like to try cooking some of these recipes with the kids:

Our snack boxes are also great time and sanity saver.

What are your favourite time saving kitchen hacks?


Happy playing,
Debs :)

DAIRYLEA, the DAIRYLEA device and MUMMY HACK are trademarks of MONDELEZ INTERNATIONAL GROUP used under licence.

Look where else we are. Are you following along? :)
New Here? Subscribe to get all activities sent directly to you
Enter your email address:


Delivered by FeedBurner
Continue reading...


Stuff and Bake Pizza Rolls. Cooking with Kids

Mar 8, 2015


Today's cooking with kids recipe is a fun idea for lunch or even a quick dinner. Children are more likely to eat it when they've been part of the process. This recipe is particularly good when you've got some left over bread rolls that didn't get eaten fresh. Use the basic recipe idea, add in your own ingredients to taste and hey, presto!

You'll need one bread roll per person. Cut a "lid" out of the top and press the bread inside to make a hollow cavity.

Prepare your pizza fillings. We used chopped baby spinach, diced fresh Roma tomato, shredded cheese, sliced green olives and some shredded ham.

Layer the fillings inside the roll. We like to put a bit of cheese on the bottom and top as well as some through the other ingredients so that it all melts nicely together.

Stuff the fillings in! As the cheese melts and the ingredients disintegrate slightly from the heat, you should really pack the fillings in so that your roll doesn't appear half stuffed after it's baked. (A good discussion point with the children about the changing properties due to heat.)


Handy tips for learning while cooking

- Whilst this recipe, unlike our banana berry muffin recipe, doesn't focus on set amounts, measuring, numbers etc. there is still a lot to be learnt naturally through discussion:

  • Talk with your children about the ingredients while you cook. The different colours, textures and tastes. 
  • Where do the ingredients come from and how they are grown/produced?
  • Where would they sit on the healthy living pyramid? 
  • Which ingredients should we eat most of and which should we eat in smaller amounts? 
  • How will the ingredients change with the addition of heat? (science)

- Simplify this recipe for younger children by prepping the rolls and chopped ingredients first and providing to your child to stuff with their desired ingredients.

- Extend this recipe for older children or those with more advanced kitchen skills by having them cut and hollow the rolls as well as chop and prepare the fillings before stuffing and putting in the oven.

- Kitchen Garden. Any vegetables you can source from your own veggie patch would be fabulous for this recipe. The process can start with the planting all the way through to eating their stuffed baked pizza roll! (And, you can make your own bread rolls as well)


When your pizza rolls are stuffed, put the bread roll lid back on top and pop them into a moderate oven until the cheese is melted inside and the outside is brown and crispy.

When they are done, cut in half so that they can cool a bit before the kids eat them and serve while still warm.

Stuff and Bake Pizza Rolls recipe

Ingredients: (we used)
  • Bread rolls
  • Cheese
  • Baby Spinach
  • Cut tomato
  • Shredded Ham
  • Green Olives

Other suggested ingredients: Pizza sauce, mushrooms, fresh herbs,  feta cheese, roast pumpkin, kalamata olives, salami, roast chicken, smoked chicken, sun-dried tomatoes, etc.

Method:

Preheat oven to 180°C  (356°F)

Cut the top out of a bread roll and hollow out.

Fill with your chosen ingredients. Stuff them in really well until it's completely full.

Pop the top of the bread roll back on and then into the oven for 10-15 minutes* or until the cheese has melted inside and the roll is crispy and browned on the outside.

*As all ovens are a bit different, keep an eye on your stuffed pizza rolls and cook for shorter or longer as needed.


Enjoy!


Here are some more Recipe ideas of ours you may want to try with the kids:


Happy cooking,
Debs :)

Look where else we are. Are you following along? :)
New Here? Subscribe to get all activities sent directly to you
Enter your email address:


Delivered by FeedBurner
Continue reading...