Super Simple Christmas Cards

Nov 29, 2012

chistmas cards toddler


This Christmas have your child (yes, even toddler) make some of these Super Simple Christmas Cards


Ages: 2+
(M was 2 here. See the Handy Tips at the bottom for ideas to Simplify or Extend to meet your childs needs)


Materials: Cardboard (for cards), green paper, sequins, glue


Cut triangles (or have your child do it, M cut these ones) of green paper and then let them stick them onto the cardboard cards and then embellish with different sized, shaped and coloured sequins.


Picking up those slippery little sequins is great practice for their Fine Motor Skills and choosing and placing their sequins is great to develop their creativity and to talk about Colours, Shapes and Sizes.


They were incredibly simple yet came up looking great. I loved the different colours and designs she chose.


To learn more about the benefits of working on the inside of the card together, see here


Handy Tips:

- Simplify this activity by pre folding/cutting the cardboard cards and green triangles. Provide together with the sequins and allow your child to paste and place them. Encourage them to think about who each card might be for first so that they can consider and choose colours and designs with the person in mind. 

- Extend this activity by having your child work on the folding and cutting of the cards and triangle trees themselves. Add extra craft materials that they can get creative with.

- Use this opportunity to talk with your child about Shapes, Patterns, Colours, Sizes and other topics that may come up in the course of the experience

- Add numeracy skills by challenging your child to use a different amount of sequins on each design. This will encourage counting and concepts of more and less.

- Write the inside of the cards together. Even if your child is pre-writing, involve them in the process and discuss the types of things included in Christmas cards together.

- We share more ideas and tips about making greeting cards with kids here


Happy creating,
Debs :)


New Here? Subscribe to get all activities sent directly to you
Enter your email address:


Delivered by FeedBurner

Are you on Facebook? We are and we'd love to see you there. You can also find us on PinterestTwitter  and G+ too. :) 

Continue reading...


Cooking with Kids

Nov 27, 2012


Once again we had over well over 100 activities linked up to Tuesday Tots last week. If you missed them or our fabulous feature on Learning and Playing with Recycled Materials, you can see it here.


This week I was getting hungry looking through some of the awesome posts so am featuring
Cooking with Kids


Cooking with kids is incredibly beneficial for a whole host of educational and developmental reasons.
It is best to start involving your children in the cooking and preparing from as early as possible so here are some fabulous recipes and instructions on some kid-friendly recipes.


(From top-bottom, left-right as pictured above)


Gingerbread from Happy Whimsical Hearts


 2 Ingredient Chocolate Crackles from Just for Daisy


Wholewheat Raspberry Scones from Mama Papa Bubba


Kid-Made Butter from Life with Moore Babies


Salt Dough Advent Calendar from The Fairy and The Frog


Fancy Fruit Salad from My magical menagerie 


Congratulations if you were featured.  Feel free to grab a featured button.


Here are some of our Cooking with Kids posts
(click on the picture to take you to the post)
    
Toddler Made Sushi                                    Lemonade Scones


............................................................................................................................................


   Learn with Play at home (me) proudly co-hosts Tuesday Tots with  Rainy Day MumGrowing a Jeweled Rose and In Lieu of Preschool. You can read more about it here 

Please have a look at the activities list below and check out any of the posts that interest you.


Now, it's your turn to link up your posts for children 5 and under. 
Can't wait to see all the fabulous activities shared this week!

(please read the guidelines before linking up)


Happy playing,
Debs :)


New Here? Subscribe to get all activities sent directly to you
Enter your email address:


Delivered by FeedBurner

Are you on Facebook? We are and we'd love to see you there. You can also find us on PinterestTwitter  and G+ too. :) 
Continue reading...


Christmas in Australia

Nov 25, 2012


  Christmas in Australia .


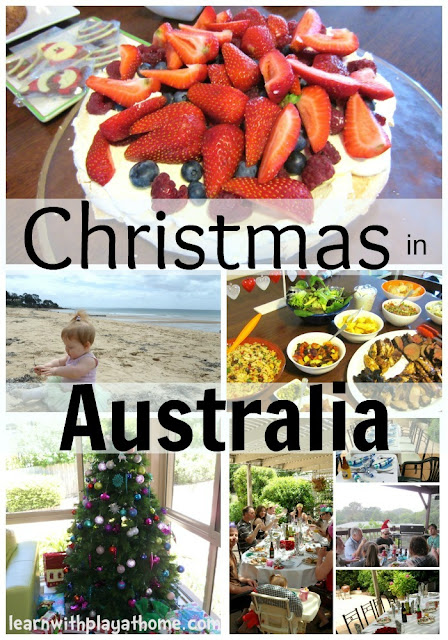
Christmas in Australia is a fabulous time of year! Some of the key words you'll often hear associated with an Aussie Christmas are, "Summer" "School Hols" "BBQ" "Beach" "Beer" "Bubbly" and "Pavs."  

Here I'll go into a bit more detail about what you might expect to see from an Aussie Christmas.
*remembering that Australia is a very multi-cultural country where residents are free to celebrate (or not) in the way that they choose.


Weather


One of the best things about Christmas in Australia is that it is Summertime! It falls in the Summer School Holidays (yay!) and depending on where you live in Australia, can be a very hot day indeed!

The average city in Australia will usually expect temperatures in the mid to high 20's (degrees Celsius) but it can get much higher than that.

Being from Melbourne, where the weather sometimes changes as easily as you'd flick a switch, I've experienced Christmas from a shivering 14C (57F) up to a "its too hot to move" 35C (95F). Basically, it could be anything, haha, but in general, we expect (hope) it to be warm. (January is when it really starts to get hot!)
A wander down to the beach. Christmas Day, 2009


Traditions


Because the weather is generally good, it's a bit of an Aussie tradition to eat Christmas Lunch outside followed by some backyard cricket or a dip in the pool.


Like other places around the world, Australians traditionally celebrate Christmas with their family and friends on December 25th which is a Public Holiday.


We've recently discovered that most of our US readers haven't heard of Christmas Crackers (or Bon Bons as they're sometimes referred to in Australia). These aren't particular just to Australia but most Aussie's I know have Christmas Crackers at Christmas Time. :)


Most families have a Christmas Tree that they decorate and many houses and gardens are also decorated with fairy lights, fake Santas and all the rest!


On Christmas Day it is traditional to give and receive presents. From parents, friends, family and Santa too. (Yes, he makes it to Australia too!)


My favourite Christmas Tradition in Australia is Carols by Candlelight. It was made popular in the 1930s in my hometown, Melbourne and has since spread across the world!
This year will be Vision Australia's 75th Carols by Candlelight in Melbourne and Christmas Eve wouldn't be Christmas Eve, without it!
Picture Source
The most famous concert is held annually at the Sidney Myer Music Bowl (pictured above) in Melbourne, where tens of thousands of people gather together to sing Christmas Carols on Christmas Eve.
In addition to this televised event, communities and cities all around Australia hold their own Carols by Candlelight in parks, schools and venues across the country over the month of December leading up to Christmas.
It's a fabulous community event and almost always takes place, rain, hail or shine :) Expect to see picnic rugs, lawn chairs, lots of kids, Santa hats, glowing things and candles.


Other Aussie Christmas Traditions can include:

Christmas Lights - some houses, streets, areas etc. are so transformed by the wonder of their Christmas lights that they become local tourist destinations. Many people take their families out for an evening drive leading up to Christmas to see all the lights. Some streets are now so well regarded for their Christmas lights displays, that roads are blocked off to allow only foot traffic through. It is wonderful and magical.

Boxing Day - ok, not quite Christmas but it's synonymous with Christmas here. Boxing Day is the public holiday after Christmas (26th Dec) and is huge for two reasons.
Firstly, the shopping! Boxing Day sales are regarded among some of the best sales of the year so the shops are PACKED!
Secondly, for sports. The Boxing Day Test is the first day of the Cricket test match that most Aussies will at the very least have going on in the background on TV.

"Christmas Drinks" - work drinks, friends drinks, family drinks... yes, lots of drinking! Usually wine, sparkling wine or beer. (or whatever's on offer) :)

Foods - see below!


Food


In Australia, the EATING part of Christmas is a pretty major one :) Many families settle down for a huge Christmas "Dinner" which is usually around midday (Christmas Lunch). This could be a traditional sit-down carve-it-up turkey or ham or the "Aussie" way of the cold ham, BBQ and salads. Seafood (especially prawns and shrimps) is also very common at an Aussie Christmas.

Buffet style barbecued meats served with a range of salads are a common Aussie Christmas Lunch


Talking about Traditions, I can't not mention the Pavlova. Whilst plum pudding and brandy custard are also enjoyed by Australians, many homes would not be without a favourite Australian dish, Pavlova (meringue covered with cream and fresh fruit). One Perfect Day have a fabulous Pavlova Recipe.


Summer fruits like berries and cherries are plentiful. As are all the summer stone fruits (Peaches, mangos, apricots etc).


The other year I did my own little version of a "plum pudding"
My individual sticky date puddings (baked in cupcake wrappers) with a butterscotch butter-cream icing, hand made sugar snow flakes and a sprinkling of silver edible glitter


Check out this great post from My Little Bookcase on making these yummy Lamington Wombats and Koalas as a special Snack for Santa


Australian Christmas Links


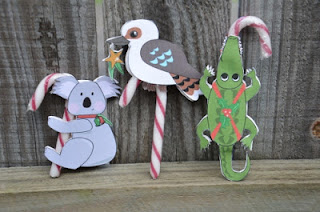
Here are some gorgeous Australian Wildlife Candy Cane Clingers from Mother Natured


A Favourite Australian Christmas Story from My Little Bookcase


An Aussie Christmas Tree Hunt and Bush BBQ from Happy Whimsical Hearts


What comes to mind when you think of Christmas in Australia?


From us to you...where ever in the world you may be... 

 ...have a very Merry Christmas. 

Stay safe, look after one another.

Merry Christmas,
Debs :)


Look where else we are. Are you following along? :)
New Here? Subscribe to get all activities sent directly to you
Enter your email address:


Delivered by FeedBurner
Continue reading...


Simple DIY Christmas Lanterns

Nov 22, 2012

This post is sponsored by Digital Parents
christmas decorations

One of the most magical things about Christmas time, for me, are all the marvellous decorations.
We all complain as the shops put them up earlier year by year, but there's something about hanging decorations that brings the festive season together and can instantly turn average spaces into magical Christmas Wonderlands.


Here is a fabulously simple craft that you can make with the kids.
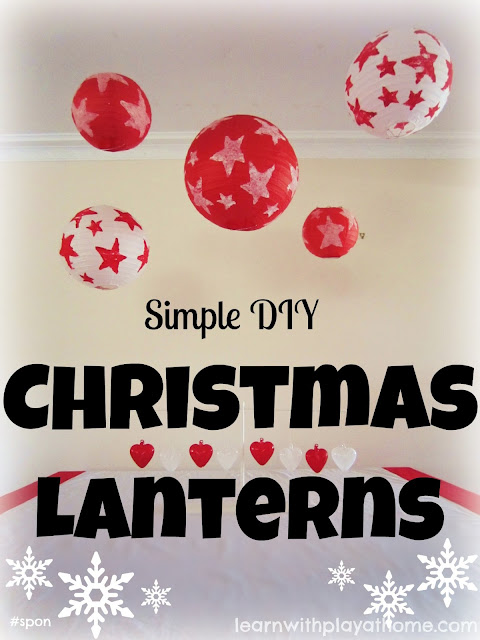
Christmas Lanterns


Materials: Paper Lanterns (buy inexpensively from variety shops or dirt cheap off ebay), sponges, paint, scissors, fishing/jewellery line, 3M Command Clear Decorating Clips


Cut shapes from your sponges. We chose a star design but you could try bell/tree/angel shapes etc

Note:Cut a different sponge shape for each colour you are using. We used 2 colours so I cut 2 large stars and 2 small stars. This is because it will take forever to get all the colour out of the sponge if you wanted to switch colours. Much easier just to use new sponges for each colour.


Press your sponge shape into your paint

Hint: Do not leave your sponge sitting in your paint, it will absorb it. If you're finding your sponge getting too damp you will need to wring it out as it absorbs the water out of the paint.


Then press it carefully onto your expanded paper lantern. 
Press down on all areas of the sponge shape to transfer the paint.


Carefully peel off your shape. If there are patches you have missed you can sponge them in or leave them for that extra character.


If you're using different sized sponge stamps, start with the larger shape and then use the smaller shapes to fill in the gaps.


Your lanterns should sit on the table but if they have wet paint where it may roll, you can stand them on a glass to dry.


We went with the traditional red and white and used a mix of large, medium and small lanterns. 
You can easily adjust the colours to suit your theme


When dry, attach fishing/jewellery line at your desired lengths. (A good way is to cut double the length you need and attach both ends to the wire in the lanterns. You can then just loop them over the hooks)

Using the Command Clear Decorating clips, position your clear hooks on the ceiling where you want your lanterns to hang. (We went with over the dining table)

After following the instructions on the hooks, your lanterns are ready to hang.

As you can see in the pic, the Command Clear range of hooks are hard to spot.
The hook is great for hanging just about everywhere, even upside down like this as they hook around so nothing can fall off.
My camera had a terrible time trying to focus on this hook on the ceiling. It focused better on the fishing line!


Ta-daa! The combination of the 3M Command Clear Hooks and the fishing line mean that even when you are quite close up, the lanterns appear to be floating over the table.

We were really happy with the result (and, after Christmas, we can always use them again in different ways as the design isn't over the top Christmas).

................................................................


Since discovering the 3M Command Clear Hooks range, I must admit that I've been really enjoying using them in so many different ways. I've been happy to use them just about everywhere because they are easy to use and they come off cleanly and without damaging my walls (or ceilings).

They work especially well on the dark wood of the front door to hang the Christmas wreath and it's great to finally have something that also isn't going to damage the door in any way (shame about the thumb tac hole from last year!)

Not that you can see in the pics above, but we actually left the unused hooks from our earlier decorating on the ceiling still as you can barely notice them and we figure we may one day use them again :)


Click here to see a FAB-U-LOUS way to use the clear hooks. We're doing a similar design at home on the window (post coming).


I could finally hang this Christmas Advent Calendar that I've struggled to hang properly each year! A Command Small Clear Hook was the perfect size.
My 3 year old is loving that it's hung at her height and she's always in there counting the numbers now.


We also used the 3M Command Clear Hooks, teamed with Paper lanterns in the following 2 posts.
(yes, we love them! haha You can click on the links to see more details)


Your Chance to Win
***COMPETITION NOW CLOSED***

Congratulations to our Winners
Lbd. bawden
Nic
Jodie Daley
Emily_lelean
Lynda Black
Please contact me with your name and postage details

I've been so happy using the Clear Hooks range for all my decorating and now
3M want to help you with your decorating too!

Thanks to 3M
5 lucky Learn with Play at home readers will win
A Command Clear Hooks product prize pack

Individually priced from $6.99 (RRP). Available from all leading supermarkets and retail outlets across Australia. 
Total of 5 Prize Packs valued at over $180


How To Win
***COMPETITION NOW CLOSED***

Leave a comment on this post telling us what you'll be hanging this Christmas

The 5 most creative responses will each win a Product Prize pack valued at $36.35 each


Terms and Conditions
- Apologies but this giveaway is open for Australian Residents Only
- The competition ends Tuesday 27th November at 9pm (EST)
- The winners are chosen based on originality and creativity
- Entrants will need to provide a valid email address
- Winners will be contacted via email and announced on this post and via FB and Twitter on Wednesday 28th Nov. Winners will need to get in contact and provide their postal address within 48 hours or the prize will be redrawn.


Good Luck & Happy Decorating,
Debs :)


{Disclosure: this is a paid post for 3M sponsored via Digital Parents Collective. We received some Command Clear Hooks to review for this post. Opinions expressed in this post, as always are purely my own}


New Here? Subscribe to get all activities sent directly to you
Enter your email address:


Delivered by FeedBurner

Are you on Facebook? We are and we'd love to see you there. You can also find us on PinterestTwitter  and G+ too. :) 
Continue reading...


DIY Party Decorations

Nov 21, 2012


Very Hungry Caterpillar Party


For my son's first birthday we had a Very Hungry Caterpillar Party. (So fun!)


Below are some of the simple, inexpensive party decorations that I made for this party, however, you can also use them for other themed (or non-themed) parties too.

Just choose your own colours!


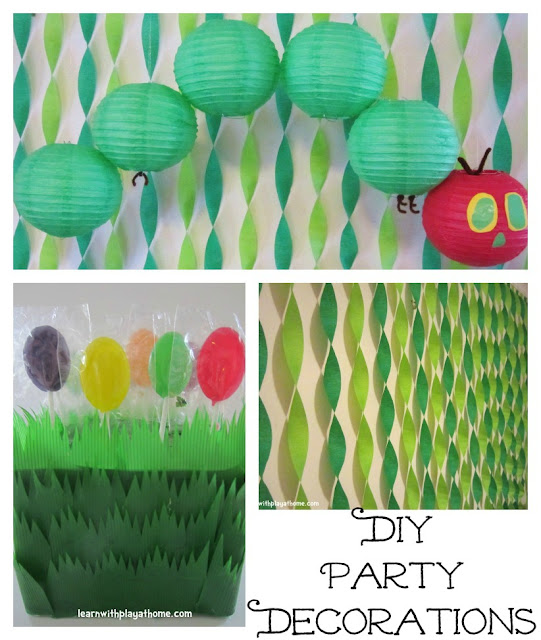
DIY POP-HOLDER

Very Hungry Caterpillar Party

A "pop holder" is really easy to make and is a cute way to display your lolly pops, cake pops and anything else you can think of on a stick :)

Here is how we made ours:


Materials: 
  • Foam block (note: I used flower foam this time as I already had it at home and they were wrapped sweets and no food was touching it.. but to make another, I'd use a normal foam block as you wouldn't want any of the flower foam touching any food), 
  • Glue, 
  • Bento grass dividers (you can buy them online, eg. ebay or shops selling Bento supplies eg. Daiso, very inexpensively)


Starting at the top, put a layer of grass dividers around your foam block. Once you have gone all the way around, start a new layer, slightly lower down so that it overlaps the top layer and so on until it is covered.


On top I stuck down some more of the grass dividers, leaving gaps for the pop sticks to push easily into


Very Hungry Caterpillar Party

Very Hungry Caterpillar Party

Poke in your pops and you're ready to go.


Paper Lantern Table Display/Paper Lantern Caterpillar

Very Hungry Caterpillar Party

Materials: 
  • Paper lanterns (can be bought cheaply on ebay or at many discount variety shops),
  • Fishing line, 
  • Self adhesive Hooks (I used Command Clear Decorating Clips).


This was such a simple yet effective way to frame our cake and you could do the same for any other party using different coloured lanterns (without the eyes, etc.).


We popped some stick-on wall hooks on the ceiling. Tied fishing line to the paper lanterns and then hung them on the hooks at the desired lengths.


The total cost of the lantern caterpillar was $12.
(I already had the other stuff at home so only had to purchase the lanterns)


Twisted Streamer Wall

Very Hungry Caterpillar Party

Behind our table we used a simple streamer wall in the party colours.

Materials
  • Streamers, 
  • sticky tape or blu-tac.

Cut all your streamers to the right length. Stick the streamer at the top, twist and then stick at the bottom.

Repeat! :)

These would look fabulous in all kinds of colours and only cost about $4 in total.


Balloon Door-frame/ Balloon Caterpillar

DIY Party Decorations

Want something even more basic? Try trimming your door frames with balloons stuck around them. 

We made a quick little caterpillar but you could use any colours you like.

These are just stuck to the wall with masking-tape. Quick and easy!


You can see the rest of our Very Hungry Caterpillar Party here.


Happy creating,
Debs :)


You can find us all over the web. Follow along via the sites below :)

Continue reading...